🛠️ Installation Instructions for AFCCP
This guide walks you through setting up the Air Force Cadet Career Problem (AFCCP) repository using PyCharm and Anaconda. You’ll first clone the repository using terminal, then choose between two setup options: - Using Terminal - Using PyCharm’s GUI
📥 1. Install Required Tools
✅ Required:
- Git
- Anaconda (Python 3.8+)
- PyCharm Community or Professional Edition
⚠️ We recommend the Professional Edition if you have access, but the Community Edition works fine too.
Personally, I love PyCharm and will always recommend it as the go-to python IDE! If you'd like to get started with PyCharm, you can follow my PyCharm Instructions.
🌀 2. Clone the AFCCP Repository
Use your terminal (Mac/Linux: Terminal, Windows: Anaconda Prompt or Git Bash). First navigate to your desired directory to clone this project. I have a folder called "Coding Projects" where I keep all of my python projects:
cd "/Users/griffenlaird/Coding Projects"
Once you're in the directory you want to clone afccp to, clone it!:
git clone https://github.com/dglaird/afccp.git
cd afccp
When you clone the repo, you should see some output that looks like this:
$ git clone https://github.com/dglaird/afccp.git
Cloning into 'afccp'...
remote: Enumerating objects: 108, done.
remote: Counting objects: 100% (108/108), done.
remote: Compressing objects: 100% (82/82), done.
Receiving objects: 100% (108/108), 120.34 KiB | 2.35 MiB/s, done.
⚙️ 3. Set Up the Python Environment
You have two options:
🧪 Option A: Using Terminal (Recommended for reproducibility)
1. Create a new environment:
conda create -n afccp python=3.10 -y
2. Activate the environment:
conda activate afccp
3. Install all dependencies:
pip install -r requirements.txt
4. Launch PyCharm, and select this environment when opening the project:
File > Settings > Project: afccp > Python Interpreter > Add > Conda Environment > Existing environment
💻 Option B: Using PyCharm (GUI)
1. Open PyCharm and select:
Open Project→ navigate to and select the clonedafccp/directory.
2. Go to:
PyCharm > Preferences(Mac) orFile > Settings(Windows)
3. Navigate to:
Project: afccp > Python Interpreter
4. Click the ⚙️ gear icon → Add Interpreter → Conda Environment.
5. Choose:
New environment(or Existing if you’ve already created one)- Python version: 3.10
6. Once created, click OK, and PyCharm will create and set up the interpreter.
7. Now install the dependencies:
- Open the built-in PyCharm Terminal
-
Run:
pip install -r requirements.txt
🛠 4. Run an Example
Perhaps you're using the terminal and want to test the repo to make sure it works. You can run my example script "example.py" that is currently sitting in the root directory.
python example.py
The code inside this script is quite simple, but demonstrates a bit of the scope of afccp. The python code is:
# Load the main afccp object
from afccp import CadetCareerProblem

# Generate a random instance of data with 20 cadets, 5 AFSCs, and 4 AFSC preferences
instance = CadetCareerProblem(N=20, M=5, P=4, printing=True)
instance.fix_generated_data(printing=False)  # Fix the data to appropriately align assumptions

# Formulate and solve the "Hospital/Residents" problem, then export all the data back to the instances folder
instance.classic_hr()
instance.export_data()
This script will generate a small test example containing all the necessary input files to run a cadet-AFSC problem instance. It will solve that randomly generated instance using the Hospital/Residents algorithm and will export all the data back to csvs. If you've followed the instructions thus far and have correctly initialized the repo, you should see an output that looks something like this:
$ python example.py
Importing 'afccp' module...
Folder 'instances' not in current working directory. Creating it now...
Folder 'solvers' not in current working directory. Creating it now...
Folder 'support' not in current working directory. Creating it now...
Support sub-folder 'data' not in current working directory. Creating it now...
Support sub-folder 'value parameters defaults' not in current working directory. Creating it now...
Pyomo module found.
SDV module found.
Sklearn Manifold module found.
Python PPTX module found.
Generating 'Random_1' instance...
Instance 'Random_1' initialized.
0 Making 8 cadets ineligible for 'R1' by altering their qualification to 'I2'.
2 Making 4 cadets ineligible for 'R3' by altering their qualification to 'I2'.
3 Making 4 cadets ineligible for 'R4' by altering their qualification to 'I2'.
4 Making 4 cadets ineligible for 'R5' by altering their qualification to 'I2'.
Updating cadet preference matrices from the preference dictionaries. ie. 1, 2, 4, 6, 7 -> 1, 2, 3, 4, 5 (preference lists need to omit gaps)
Converting AFSC preferences (a_pref_matrix) into percentiles (afsc_utility on AFSCs Utility.csv)...
Updating cadet columns (Cadets.csv...c_utilities, c_preferences) from the preference matrix (c_pref_matrix)...
Sanity checking the instance parameters...
Done, 0 issues found.
Modeling this as an H/R problem and solving with DAA...
New Solution Evaluated.
Measured exact VFT objective value: 0.7909.
Global Utility Score: 0.7364. 0 / 0 AFSCs fixed. 0 / 0 AFSCs reserved. 0 / 0 alternate list scenarios respected.
Blocking pairs: 1. Unmatched cadets: 1.
Matched cadets: 19/20. N^Match: 20. Ineligible cadets: 0.
Exporting datasets ['Cadets', 'AFSCs', 'Preferences', 'Goal Programming', 'Value Parameters', 'Solutions', 'Additional', 'Base Solutions', 'Course Solutions']
If successful, you should see a new "Random_1" data folder inside your constructed "instances" folder. The instances folder is located in the root directory:
afccp/                 # Root directory
├── instances/         # Problem data folder (generated from afccp)
├───── Random_1/       # Specific problem instance (newly generated data)
For more information on the instance data structure used by afccp, please refer to the Data module.
5. Install Pyomo Solvers
One very important step is the setup of the optimization solvers used by Pyomo.
- The
solvers/folder will be automatically created the first time you import theafccpmodule. - You can manually place solver executables in this folder (e.g.,
baron,bonmin,couenne,cbc, etc.).
🔧 Recommended Method for Solver Setup:
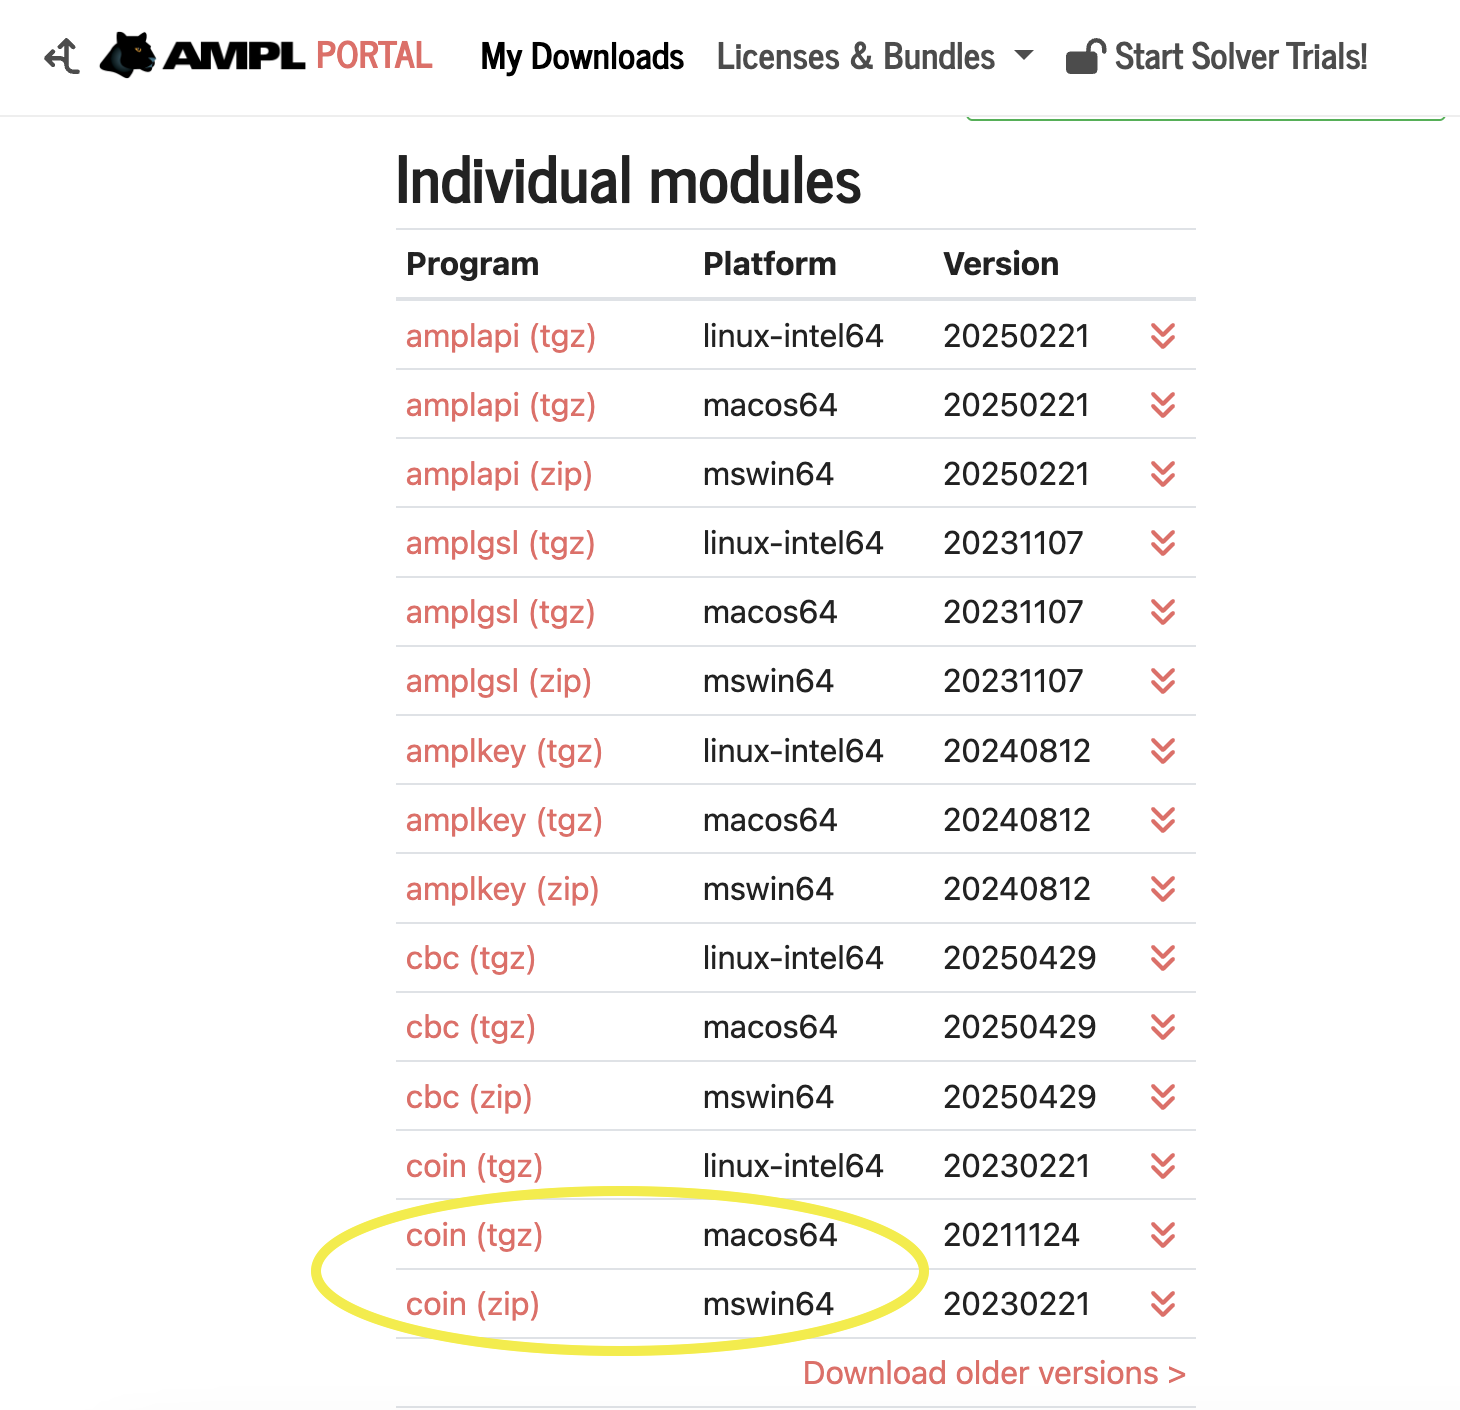
- Go to the AMPL download portal.
-
Under COIN-OR solvers, choose the appropriate compressed "coin" package for your operating system.
- This page has undergone changes, and so I have no guarantee what it'll look like in the future.
- As of right now (June 2025), you can scroll down to the "Individual Modules" section, and select the version of
the COIN-OR solver collection that fits your operating system (MacOS or Windows):
-
Download and extract the ZIP file.
- Locate the solver executables inside (e.g.,
cbc.exeon Windows orcbcon Unix-based systems). - Drag those solver executables into the
solvers/folder in your working directory (the same directory as yourafccp/project).
✅ Once placed, afccp will detect and use the solvers when solving Pyomo models.
🔒 Note: Make sure the solver files have execution permissions (e.g.,
chmod +x cbc) on Mac/Linux.
🧪 Solver Test
The main solver used for the majority of the afccp models is the CBC solver. Let's make sure
it is working with Pyomo in your afccp environment.
📋 Test Script
Copy the following code into a file called test_solver.py in your project root:
from pyomo.environ import *

# Define a simple model
model = ConcreteModel()

# Variables
model.x = Var(within=NonNegativeReals)
model.y = Var(within=NonNegativeReals)

# Objective: Maximize 3x + 4y
model.obj = Objective(expr=3 * model.x + 4 * model.y, sense=maximize)

# Constraint: x + 2y <= 8
model.constraint = Constraint(expr=model.x + 2 * model.y <= 8)

# Solve with CBC
solver = SolverFactory("cbc")
result = solver.solve(model, tee=True)

# Print results
print(f"x = {model.x():.2f}")
print(f"y = {model.y():.2f}")
print(f"Objective = {model.obj():.2f}")
▶️ Run the Script
In your terminal (with your virtual environment activated):
python test_solver.py
✅ Expected Output
If CBC is correctly configured, you should see output similar to:
Welcome to the CBC MILP Solver
...

x = 8.00
y = 0.00
Objective = 24.00
⚠️ Troubleshooting
If you see an error like:
ApplicationError: No executable found for solver 'cbc'
That means Pyomo cannot find the CBC executable. Here are your options:
✅ Option 1: Verify the solver location
Make sure that:
- You've downloaded CBC from the AMPL coin-or page
- You extracted the ZIP file and found the
cbc(orcbc.exeon Windows) executable - You moved that file into your project's
solvers/folder (this folder is created after first importingafccp) - On Mac/Linux, the file is executable:
chmod +x solvers/cbc
✅ Option 2: Provide the full path to the CBC executable
If Pyomo still can’t detect it, specify the full path to the solver manually:
from pyomo.environ import *

solver = SolverFactory("cbc", executable="solvers/cbc")  # or "solvers/cbc.exe" on Windows
This bypasses the PATH lookup and tells Pyomo exactly where to find CBC.
🧪 You can also test this directly in the Python console to verify that it resolves:
from pyomo.environ import *
SolverFactory("cbc", executable="solvers/cbc").available()
It should return True if CBC is accessible and working.
Once CBC is properly located and executable, your test model should run without errors.
📁 6. Project Structure
afccp/
├── afccp/                # Core source code
├── docs/                 # MkDocs documentation
├── instances/            # Input instance data
├── support/              # Data shared across instances (Private- ask AFPC/DSY)
├── files/                # Data shared across instances (Publically available)
├── solvers/              # Solver .exe files for use by Pyomo
├── requirements.txt      # Python dependencies
├── mkdocs.yml            # MkDocs config file
└── README.md             # Project overview
📚 7. View the Documentation Locally
If you want to view the full documentation site locally:
mkdocs serve
Then visit http://127.0.0.1:8000 in your browser.
🚀 8. (Optional) Rebuild Reference Pages
To generate API reference pages:
python afccp/gen_ref_pages.py
Be sure to run this from the project root directory, where
mkdocs.ymlis located.
🧪 9. Run Unit Tests (if available)
If the repo includes tests:
pytest tests/
🧠 More Info
- Author: Griffen Laird
Happy modeling! ✈️